 English
 Español
- Medical Equipment
- Ultrasound Scanner
- Digital Mobile Ultrasonic Diagnostic System
- Palm Digital Ultrasound Scanner
- Digital Portable Veterinary Ultrasound Scanner
- Palm Digital Veterinary Ultrasound Scanner
- Digital Laptop Ultrasound Scanner
- Portable Ultrasound Scanner
- Trolley Ultrasound Scanner
- Color Doppler Ultrasound Scanner
- Portable Color Doppler Ultrasound Scanner
- Portable Color Doppler Ultrasonic Diagnostic System
- Trolley Color Doppler Ultrasound Scanner
- Patient Monitor
- Automatic Stool Analyzer
- Health Care Devices
- Self-exam Colposcope
- Digital Blood Pressure Monitor
- Aneroid Sphygmomanometer
- Aneroid Sphygmomanometer kit
- Palm Type Sphygmomanometer
- ABS Desk, Wall Type Sphygmomanometer
- Stethoscope
- Diagnostic Penlight
- Neurological Hammer
- Fiber Optic Otoscope
- Ophthalmoscope

 landy.industry20@gmail.com
-

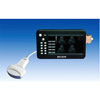
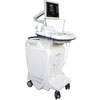
- Landytop3000M Digital Mobile Ultrasonic Diagnostic System
Continuously variable aperture
TGC (Near Middle Far) ...
-

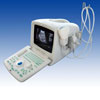
- Landytop 3000P (Vet Use) Digital Portable Veterinary Ultrasound Scanner
Continuously variable aperture
TGC (Near Middle Far)
Dynamic filtering ...
-
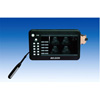
- Landytop 3000M+ Digital Mobile Ultrasound Scanner
Continuously variable aperture
TGC (Near Middle Far)
Dynamic filtering
Dynamic ...
-
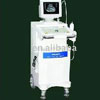
- Landytop200D Digital Portable Ultrasonic Diagnostic
(1) Landytop200D Main unit
(2) 10 non-interlaced SVGA
(3) 1pc 3.5MHz R60 convex...
-
- Landytop 3000P+ Palm Digital Veterinary Ultrasound Scanner
User can check the cow with rectal probe 28 days after Artificial Insemination ...
-

- Landytop3000N Digital Laptop Ultrasound Scanner
Being composed with the technology of electronic convex array (3.5MHz) ...
-

- Landytop200C Portable Ultrasonic Diagnostic
The Landytop 200C is a high-resolution Linear and Convex probe ultrasound system...
-

- Landytop200A Portable Ultrasonic Diagnostic
(1) Landytop200A Main unit
(2) 1pc 3.5MHz R60 convex probe
(3) 10” non-interlaced ...
-

- Landytop256A Trolley Ultrasound Scanner
(1) Economical trolley ultrasound scanner with 3.5MHz R60 convex probe
(2) 10" SVGA monitor ...
-
- Landytop256B Trolley Ultrasound Scanner
(1) Popular trolley ultrasound scanner with 3.5 MHz R60 convex probe
(2) 10" SVGA ...
-

- Landytop256C Trolley Ultrasound Scanner
(1) Deluxe trolley ultrasound scanner with 3.5MHz R60 convex probe
(2) 14" SVGA ...
-
- Landytop3000A Digital Ultrasound Scanner
(1) Landytop3000A Main unit
(2) 15 inch LCD
(3) 1 pc 3.5 MHz R60 convex probe with 128 ...
-

- Landytop3000F Digital Ultrasound Scanner
(1) Landytop3000F Main unit
(2) 14 CRT monitor
(3) 1 pc 3.5 MHz R60 convex probe with 80 ...
Ultrasound Scanner
Advantages of Ultrasound Scanner (Ultrasonic Diagnostic):
(1) With the advance of VLSI and SMT, the ultrasound scanner (ultrasonic diagnostic) is more reliable compared with other apparatus.
(2) By adopting multistage dynamic focalizing, variable aperture, digital scanning, related digital graphic processing, etc., the ultrasound scanner can provide sensitive, steady, clear, high-resolution pictures.
(3) Equipped with B, B+B, B+M, M display modes and the 256 gray scales screen.
(4) Display frozen pictures, two pictures in the same frame, and freeze one of the two pictures or both the two pictures. Moreover, the displayed picture has the feature of polarity reversal and bilateral reversal.
(5) Magnifications of picture are adjustable in the process of operation.
(6) Upgrade of the depth of the picture.
(7) Full screen editable characters, real-time clock, body-position indication, operating indicator of Route Ball Mouse.
(8) Multi-measurement of length, perimeter, area, M-type conventional examination and gestational measurement.
(9) Terminal output of standard PAL system, which will meet the requirement of different users.
(10) Soft-touch keyboard, plastic exterior case, which are good-looking, portable, and convenient to operate.
Operation and Precautions of Ultrasound Scanner (Ultrasonic Diagnostic):
Keyboard Preparation
Unlock the keyboard by pressing the lever on the front panel.
Power Cord
Adhere to the electrical power rating. The system is adaptable to 220/230 volts (To use 100/120 volts is optional to users. Contact with the manufacture if 100/120 volts is needed). Plug the system power plug into the AC outlet, which is located in the rear panel. To connect the system to the power supply: ensure that the wall outlet is of the appropriate type. Make sure that the power switch is turned off.
Unwrap the power cord. Ensure sufficient slack in the cable so that the plug is not pulled out of the wall if the system is moved slightly. Push the power plug securely into the wall.
Warning
To avoid risk of fire, the system power must be supplied from a separate properly rated outlet.
The system is supplied with a power cord. Under no circumstances should this cord be altered or changed. To assure grounding reliability, connect to a grounded power outlet.
(USA AC outlet is 100/120 Volts, Europe outlet is 220/230 Volts)
Connecting the Probe
Insert the probe plug in the socket exactly. Revolve the locking handle by 90 degree to fasten it.
To uninstall the probe, revolve the locking handle in reverse direction by 90 degree and unplug it.
Caution: It is strictly forbidden to pull out or insert the plug when the machine is power on. To disconnect the probe, hold the plug instead of pulling the cord to avoid damage of the ultrasound scanner (ultrasonic diagnostic).
Grounding Protection
If no grounding socket is available, or grounding conductor is not connected, you should use a metal wire, whose cut-area is <1mm2, to connect the grounding conductor to the ground.
Caution: the setting up of grounding protection should be under the instruction of the experienced electrician or relevant standard.
Switching on
First, turn on the magnetic lock on the front panel of ultrasound scanner (ultrasonic diagnostic), then press down the Power button, which will light the power-indicate LED on the keyboard.
When apparatus runs into normal working state, you can use brightness, contrast, gain and near-restrain buttons to get required image.
Diagnosis
The patient should lie on his (her) back on the bed, and apply the contact agent (medical ultrasonic coupling) on the to-be-checked part of the patient. At this point, the section picture of the part is displayed on the screen with the probe contacted the to-be-checked part closely. With the altering the directions and gradient, various section pictures can be observed. Choose the section picture you need and press “Freeze” to get the picture as basis of diagnosis. During the period, if the brightness, contrast and gain of the picture remains unsatisfying, you can adjust the BRIGHT and CONT, or the signal gain—NEAR, FAR and GAIN until the clear picture is displayed.
Measurement
Through diagnosis, freeze the optimal picture and measure the specifically concerned position. The measurement contains: distance, perimeter, area, M-type regular examination, and gestational examination
Photo and Print Photo
When the picture is frozen, use the instance camera or regular camera to take a photo of the picture.
Connect the Video-Picture printer’s AV-input cable plug to the output socket of the apparatus. Turn on the printer, and follow the instruction of it to operate.
Turn off the Ultrasound Scanner (Ultrasonic Diagnostic)
When operation is finished, turn off the power of ultrasound scanner; if it will not be used for a long time, disconnect the power plug from the socket.
Caution: Do not un-plug the power cable when the ultrasound scanner is still working. Wait for 2-3 minutes to re-start the apparatus after shutting it down in order to protect the apparatus from being damaged.
Maintenance of Ultrasound Scanner (Ultrasonic Diagnostic):
Regular maintenance
Check the power supply on a scheduled basis. If the power supply is out of the normal range--AC220V±10%, 50Hz±1Hz, you should not turn on the apparatus at any time. Check the power supply cable and probe cable regularly, and replace it when any damage or rupture occurs.
(1) The environment should be confirmed to the standards mentioned.
(2) The ultrasound scanner shall be kept clean. After the plug is pulled out, it shall be wiped with soft cotton ball containing alcohol. When the interior part needs to be cleaned, use the fan to tidy the dust.
(3) Do not turn on or turn off the ultrasound scanner frequently, Wait for 1-2 minutes to re-start up the apparatus after shut down in order to protect the apparatus from being damaged.
(4) The ultrasound scanner shall be put steadily. Carry and place it lightly.
(5) Avoid placing heavy things on the apparatus.
(6) If the ultrasound scanner is idle for a relatively long time, put it in the package box and keep it properly. The environment should confirm to the requirement of 9.
(7) If ultrasonic diagnostic is idle for a long time (over 6 months), it shall be powered on twice a week for at least 2-4 hour every time.
Maintenance of the Probe:
The Probe is a vulnerable component. During the application, avoid impacting, falling or squeezing. During the pause of diagnoses, the probe should be put into the probe box, and you should also press the “Freeze” key to keep the apparatus in a “freeze” state.
Contact agent which is applied on the probe shall be “medical ultrasonic coupling”. Strictly avoid any other type of corrosive coupling applying to the probe.
After clinical use, and contacting with the patient, the probe shall be sterilized and cleaned with medical alcohol. It must be put into the probe box.
It is not allowed to soak the probe in other conducting or corrosive liquid, otherwise the probe and its sheath will be corroded.
When the probe is soaked into liquid, the distance above the sound window should be more than 10mm; otherwise, the interior components would be damaged by the liquid which seeps into the probe. Check the exterior of probe regularly to ensure that the outer layer of the probe is fully closed.
If the connection between the probe and the ultrasound scanner (ultrasonic diagnostic) is properly set up, you should not disconnect them randomly to avoid the connection problem of probe plug and socket.
NOTE: Petroleum or other organic solvent is forbidden to clean, sterilize, and disinfect the probe; otherwise, the probe will be destroyed.
Caution: When the ultrasound scanner (ultrasonic diagnostic) is working, unplugging the probe is forbidden. Even slight impacting or falling down of the probe might damage the chip inside the probe, and this damage is irreparable. If the front film is broken, do not dissemble it at will, and do not use it any more since there is high-voltage electricity in the probe. Send it back to the manufacturer, and we will repair it for your further use.
Landytop is a professional manufacturer and supplier of ultrasound scanner (ultrasonic diagnostic) in China. We offer a variety of manufacture portable ultrasound scanner, trolley ultrasound scanner, digital ultrasound scanner and digital laptop ultrasound diagnostic. We possess 10 years’ experience of producing, selling and serving. Our company’s products have been exported to Egypt, Syria, Afghan, Indonesia, Lebanon, Nigeria, Yemen, Peru, Iraq, Pakistan, USA, Canada, and Mexico. If you need ultrasonic diagnostic, please contact us and we hope you can visit our factories by yourselves. You can by T/T, D/P, L/C, Western Union, Credit Card, and Paypal to complete the transaction.